Friday, October 31, 2008

Making Christmas Booties

I made these


Using the pattern pieces for the bootie in this.


Materials needed:
about .3 meters (or a third yard) of your outside fabric.
the same amount for the lining
a little piece of batting (or fleece)
a small piece of an anti- slip material

I had to alter the pattern because the first time I made these,they were humungus.
I photographed the pattern pieces on my cardboard cutting board so that if anyone wants to make them they can draw the pieces to scale or at least have a general idea on the size of each piece.


To determine the size to make, I layed my size 7.5 shoe onto the sole pattern piece, drew around it and cut it out. I realized I had fogotten to include a seam allowance so I glued it on white paper,and added a .25' sewm allwance.


To determine the dimensions of the boot , measure around the sole pattern piece from mid-point of toe to mid-point of heel:


The bottom of the boot will have to be the same size as this measurement.


The bottom of the cuff has to be the same size as the top of the boot. (I forgot to take a pic).

These are the pieces cut out of the outside fabric.. You will need to cut the same pieces for your lining.


The long straight piece is to make a bow. I didn't use it.

For my anti-slip material, I used the stuff you put under a mat and cut out two sole grips.


Trim away a half inch (.5") from the sole grip.


To sew the sole grip to the sole piece,you can probably use a roller foot (I don't have one for this machine ),or a walking foot but I just covered it with tissue paper and used a fairly wide zigzag stitch. I had no trouble at all with this.


Peel off the tissue. There will be little bits of paper stuck in the seams but it doesn't take long to get rid of them.


Next sew the sole to the sole liner.


Sew back and front seams of both layers of each boot.Do the same for the lining pieces.Join outside and inside layers with the wrong sides together. Stitch along the top and bottom of the boot


Pin and sew the sole to the boot with right sides together.


Turn right side out. This is what you'll have so far:


Assemble the three layers of the cuff together with right sides together and the batting on the outside.


Sew along the curved edge, then turn right side out. The batting will now be on the inside.
Baste the three layers along the straight edge.
Trim the batting close to the line of stitching but do not cut away any of the seam allowance of the lining or outside fabric.


Pin the cuff to the boot right sides together and sew.


Trim away the batting from the seam to flatten it as much as you can . With the seam flat and toward the sole of the bootie, topstitch through all thicknesses.


Add a ribbon and tie it in a bow or using the pattern piece, make your own fabric bow,and you're finished.Use your imagination and try a pair.


For many more pictures look here.

Wednesday, October 29, 2008

BFF+Gold+Card.jpg (image)

Amy of Shirts and Skirts Galore left me a Friendship award the other day. Thank you so much Amy . I'm so flattered. I still think of myself as a novice in this blogging world so I'm naturally surprised you picked me.
I'm not sure how this goes but,I'm going to have a go.I'm suppose to choose 5 blogs that I love to visit,one being from another part of the world. So my friendship awards go to:

Belinda of Sew-4-Fun
Carolyn of diaryofasewingfanatic
Ann of Ann's Fashion Studio
Julia of Julia's Sewing Blog

and from Spain

Paco of Paco Peralta

I'll make a little confession here. I accidently deleted the post of the same subject that I published the other day, so I redid this. Ann had left a comment and it of course no longer appears. ( WHOOPS)

Tuesday, October 28, 2008

Vogue 1060 Again

I needed a new, warm and cozy robe for the cold weather coming up. I bought a sooo soft two sided fleece and decided to use Sandra's coat pattern because I knew it was quick to make and I thought that the style was ideal for a robe.


I added about 18 inches to the length and this time, I added an inch to the side seams to make the robe more roomy but I left out two of the three darts from both the front and back.As well, this time I used the front facings.I sewed them down on the inside so they would stay put. I sewed the pockets according to pattern instructions . I added a full tie belt and belt loops to the back and sides.


This pattern worked really well for a robe. It is slightly fitted but yet roomy enough for comfort.

I had a bit of fabric left so I decided to make booties. I used Butterick 4405 (OOP)


I think these would be a great Christmas gift for just about anyone.If you have the pattern and decide to make them , keep in mind that they are very big. I altered the pattern to fit my size7.5 feet. I intend to post a tutorial on how to make them. I took lots of photos, including the pattern pieces on a grid so you can draw them to scale.

But at the moment,I'm having a problem importing my pics to my post . They are appearing as javascript. Anyone out there have this problem or know how to fix it ??

Happy Sewing from Diana

Monday, October 20, 2008

Trench Coat S4084 for my Daughter-Finished


I finally finished my daughter's coat. It seemed to take forever and I'm really quite tired of making coats ,at least for now. I'm awfully happy that SWAP 2009 doesn't include a coat in any form!

Here it is. It turned out very well ,I think. I like it even better than mine.


I once again used a heavy linen which I washed and dried three times in hot water and a hot dryer respectively (a la Sandra Betzina ).

This time I limited my top-stitching to two rows instead of seven.


I lined it in a navy silk charmeuse which my daughter said felt very luxurious. I had enough of the silk to make her a scarf as well. I forgot to photograph the lining so this is the best I can do to show it.


I couldn't find buckles for the belt or sleeve bands that matched the red linen so I had to settle for buttons and carriers.

I'm very satisfied with the buttons. They are a perfect match.


If you like, you can go here to see all the details of the coat.

My husband and I travelled to Ottawa for a long weekend last week so I was able to take pictures of Tamara in her coat. It looks really good with the boots,Tamara!


Friday, October 3, 2008

Making Coats, Part 1

I need to take a little break from sewing because my thumbs are hurting .I thought you might like to see some of the coats and jackets that I've sewn in the last few of years.I'll post a few photos below and more here. ( I've finally learned how to insert the links....YEAH!!! )

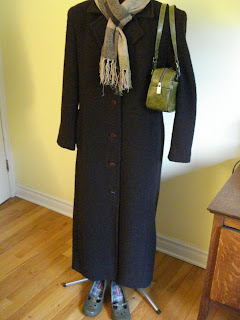
Actually the first coat I'll show you was made in the spring of 2003, but I still wear it and love it. I used Vogue 7606, which is now discontinued .


I changed the design to make it into a long coat because five years ago, we were still wearing long things. I also added buttons and a kick pleat.
I used a drapery fabric which has a raised texture and almost looks quilted.If you look closely ,you'll see that I almost pressed out the texture in the front. This is a fault I have- of over-pressing.


My second coat was made from the same pattern. The major differences are no kick pleat, the fabric is a curly textured wool and by then ,I had bought Sandra Betzina's Power Sewing book and had learned her tailoring techniques for a better fitting garment.Here I'm showing you the coat and the book:


I get a lot of compliments on this coat and it is truly one of the most comfortable coats I've ever worn.For anyone who is interested in knowing the steps I used from Power Sewing, I'll next post a tutorial on the subject.

In the spring of 2005, I made a shorter length coat and a matching skirt for a wedding. Again I used a drapery/upholstery fabric. For the skirt, I used the reverse print.The pattern for the coat was Vogue 7978 shown below , and for the skirt V2854 Both, I think are discontinued..


Although I used Power Sewing tailoring techniques and the coat hangs well, I still hadn't learned all I needed to know about fitting and I find it a bit too roomy for the style. But I wear this a lot. It also looks good with a dressy pair of jeans.


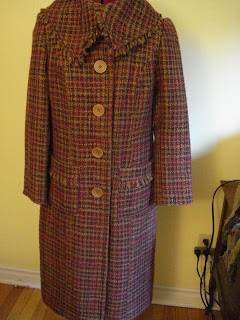
This past winter, I made Butterick 4465.


I had a hard time to decide on the length of the coat and which collar to use. I finally decided on view B for both. I'm not in love with the collar and I may yet decide to remove it and make collar D.

The fabric is a heavy wool blend boucle. My design details were to add fringe to the collar and patch pockets. I also used a contrasting faux suede for the bound buttonholes. I really like the contrast, don't you?


This coat s very warm and cozy but it isn't a favorite. I will wear it but probably not for years and years.

That is the disadvantage of sewing isn't it? you can't always get an accurate vision of what a garment will look like until its finished.

Last winter,I made Vogue V8123 . I think this is just the cutest coat! (Now I'm sounding like Sandra Betzina! )I made it out of a black mink faux fur.


To avoid bulk, I lined the coat right up to the edge of the centre front and added elasticized loops and pretty buttons. To hold the lining in place at the front ,I pick stitched along the "pelts" on each side.


For whatever reason, the sleeves ended up being a little too short (nothing new with that eh, Tamara?).I had to add a bit of a cuff but I guess that added another design element.

This jacket is really fun to wear. I wear it with jeans, dress pants, a red wool double knit dress that I love ,etc.

For those of you who subscribe to Burda World of Fashion, the Oct. issue features Faux Furs .The purple one is really very similar to mine. I think that's pretty cool.

So this is the first instalment of my coats and jackets.Let me know what you think. Should I change the collar on the boucle coat???
Happy Sewing ,everyone!