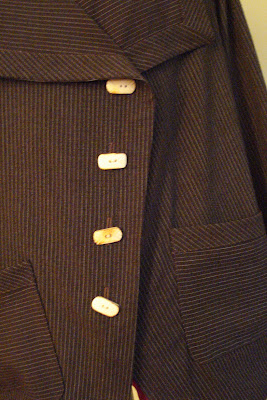
for a long time and was hesitant to make it because I had read unfavorable reviews. I knew it would be boxy, a style not flattering on me.
I practically haunt Marci Tilton's website. I love all the items she shows and all the info she provides about the featured garments. I came across this one

a couple of weeks ago and was very inspired to try a version of my own.Marci gave this info on how she had changed the pattern
"The pattern ran big on her slim frame, so we pared it down, making a double pointed dart at the back neck, adding a seam at the center back."
I didn't get the dart at the neck part but after finishing the jacket, I now understad but I'll get to that later.
Armed with this scant knowledge I dug in and started my pattern changes.
I'll show you what I came up with and then itemize my changes to the pattern.

I wanted a jacket to wear with my Marci Tilton skirt which I love and had lots of fabric left over . I decided against the off white top-stitching though as I thought it would limit what I could wear with it.
The fabric is a very stretchy and not very heavy cotton/lycra suiting.
The changes I made to the pattern are as follows with the help of photos.
I narrowed the shoulders and added what I took away to the sleeves.

I raised the armhole at the side seams and lowered the underarm of the sleeve.

I then measured the armscye and compared it to the sleeve. I found that the sleeve measurement was less so I had to deepen the curve toward the underarm of the sleeve until I had enough ease.
Now I want to stress that I really didn't know what I was doing and had no idea if all this would work.
I added a bit to the length of the jacket and a back seam and curved it in by using the back pattern piece of another jacket. This was to give the jacket a little extra shaping .

This worked very well except I forgot to add the seam allowances and had to butt the two back pieces together with a zigzag stitch and cover it up with bias strips on both the outside and inside of the back.In truth, I could have just sewn the back together without having added the seam allowance because the neck area as well as the whole jacket is very roomy.
No harm done because the back hangs very well.

That brings me back to the double eyed darts Marci talked about.I should tell you that the collar and jacket front are all in one piece. I think she started the dart at the collar outside edge, probably halfway between the center back and the shoulder seams ,fattened the dart through the neck and ended in a point down from the shoulder in the upper back.The reason I think this is that the collar sits back and away from the neck quite a lot and could be taken in in this way.

and this technique would have helped solve this. I'm hoping to illustrate this on my other blog this week but no time right now.
It's too late for me to add these darts now but if I ever......
After the jacket was put together and after trying it on,it didn't look well left unbuttoned.It seemed to want to close in a slanted line so I made buttonholes on a straight line along the center front. I didn't dare cut them open so I sewed the buttons over them and and added snap closures with one side on the slant. That works well IMO. ( I forgot to take a pic of the snaps)

I also added pockets, again they seemed to want to be slanted

and the sleeves wants to be rolled up

Oh and BTW, there's a big dart going upward from the bottom of the sleeve! Yes it works! I wondered why it was there but I like the effect.
All in all, I like this jacket although it doesn't photograph well at all. I would make other changes if I ever make it again. It's still very roomy but definitely wearable.

Another possibility of placing the collar. There are others as well.

If you can stand to look at yet more photos, look here.
Have a great week and I hope you had time to sew on this long weekend!


